This snowman is made of tear-off cupcakes covered with delicate curls protein glaze, just doomed to become the center of attention on party during the winter holidays. To a large number of guests it will be convenient to treat yourself, tearing small cupcakes from a large figure. Of course, a separate portion of admiration will go to multi-colored a scarf woven from sour marmalade ribbons. Share with friends: 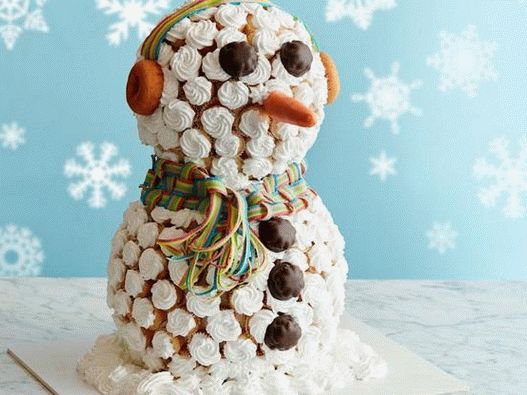 Time: 4 hours. Complexity: easy Quantity: 240 cupcakes Recipes use measuring containers volume: 1 cup (st.) – 240 ml. 3/4 cup (st.) – 180 ml. 1/2 cups (st.) – 120 ml. 1/3 cup (st.) – 80 ml. 1/4 cup (Art.) – 60 ml. 1 tablespoon (tbsp.) – 15 ml. 1 teaspoon (tsp) – 5 ml.
Contents
Ingredients for the recipe:
Snowman
- Four packs of 430 gr. cupcake baking mix (plus the necessary ingredients for the egg protein version)
- 2 tbsp. pieces of white chocolate to melt *
- 1 tbsp. l finished vanilla glaze
- 1 tbsp. pieces of orange chocolate to melt *
- 5 chocolate marshmallows
- Two ribbons of sour marmalade of rainbow colors 23 cm long. And ten ribbons 91 cm long.
- 2 yeast-free donuts
Glaze
- 2.25 Art. Sahara
- 2 tbsp. l lemon juice
- A pinch of fine salt
- 12 large egg whites
Recipe:
You will need:
Mini molds for cupcakes; approximately 240 white paper mini-liners for cupcakes; large base (approximately 38 by 51 cm) for installation a snowman, for example, a foam board; big a medium sized star pastry bag; before 300 toothpicks; foam sphere 25 cm in diameter; The scope of polystyrene with a diameter of 18 cm; about six wooden skewers 30 cm long. Recipes with similar ingredients: baking mixture cupcakes, cream, chocolate, marshmallows, icing sugar, lemon juice, eggs
Recipe preparation:
- Preheat the oven to 177 ° C. Cover Cupcake Mini Molds white mini liners.
-
Cupcake Snowman
Make the cupcake dough according to the instructions on packaging for the version using egg whites. Fill out each liner is half. Bake while a toothpick is inserted to the center, will not go clean (10-12 minutes). Move to grill to cool completely (approximately 30 minutes). Repeat that same with the remaining test. In the end, you should be able to about 240 cupcakes.
- Melt the pieces of white chocolate in a medium bowl, suitable for use in a microwave. Every 30 seconds turn off the heat and stir until the hot pieces are completely the rest will melt and the mass will not become homogeneous (about 1 minute). Pour 2 tbsp. l melted chocolate in the center of a large a serving platter or board (e.g. a poster board from foam 38 cm by 51 cm). Put the foam sphere with a diameter of 25 cm. on the melted mass, which should stand and harden (approximately 10 minutes). This will be the bottom ball of the snowman. Note * Chocolate for melting Candy Melting can be different colors and is intended for glazing finished pastry products, for example, cake pops and truffles. Such a coating does not melt at room temperature. Candy glazed finished product Melting, acquires caramel softness and taste of chocolate.
- Trim 5 cm from the blunt end of three wooden skewers 31 cm long so that they are the same. Mark the center of the sphere. Stick a bundle of 3 skewers into it with blunt ends inside so that they stick up halfway up. Align Styrofoam Sphere 18 cm in diameter above the center of the lower ball and lower so that skewers entered her, attaching a snowman’s head. Leave 2.5 cm. the gap between the two spheres.
- Set aside 5 cupcakes for making a nose later. Cover bottom of 16 cupcakes with melted white chocolate (warming it if necessary). Attach them to the lower sphere so that they in contact with the board, creating a ring that keeps the base from rolling.
- Stick a toothpick on top of the center of each of the remaining cupcakes so that she steps out on the other side. Cover the base of one of cupcakes with a little melted white chocolate, after why attach the product to the sphere. Start from the bottom and hold on to toothpick top. Place it above the space between the muffins bottom row. Insert so that the toothpick is not visible and the chocolate covered bottom pressed against the sphere. Working in batches, bye melted chocolate has not frozen (reheat if necessary him), repeat the same with the remaining cupcakes. Go on until the bottom and head of the snowman are completely covered.
-
Carrot nose
Crumble in the middle bowl 5 cupcakes that were set aside so far finely as possible. Add vanilla frosting and well mix so that a dense ball can be formed from the mass. Blind the resulting carrot mixture 10 cm long. Cut wooden skewer 30 cm long in half. Half without a sharp end throw it away. Enter the skewer longitudinally to the center “carrots” so that the sharp end sticks out of the base of the future nose. Freeze until solid (approximately 30 minutes).
- Melt the pieces of orange chocolate in a medium bowl, suitable for use in a microwave. Every 30 seconds turn off the heat and stir until the mass is completely will melt (1-2 minutes). Dip the frozen carrots in the resulting mass to cover completely. Move to parchment coated paper minutes).
- Attach the nose to the center of the face with the sharp end of the skewer. Press until the wooden skewer is no longer visible and “carrots” do not align.
-
Glaze
Bring to a boil a small layer of water in a saucepan, on which you can install a heat-resistant bowl of a stationary mixer so so that its bottom does not touch boiling water. Add sugar, lemon juice, salt and egg whites in a bowl. Whisk by hand. Set the bowl over boiling water and beat until the mixture is warm to the touch and sugar will not completely dissolve. Attach the bowl to the stationary mixer equipped with a whisk, and beat on medium-high speed until the mixture cools and forms steady peaks (10-15 minutes).
- Move a quarter of the glaze into a large pastry bag with medium sized star nozzle. Plant patterns “roses” for each cupcake, starting from the center and spinning outward, until the entire top is covered. Fill a pastry bag with icing as needed.
-
Cut 3 toothpicks in half and discard one half. Insert remaining parts of toothpicks with pointed ends in coated marshmallow chocolate from below, making sure not to pierce through. In those places on the head where the eyes should be, attach 2 marshmallows with toothpicks to 2 cupcakes. Attach 3 below marshmallow to 3 cupcakes where the idea is located buttons.
-
Headphones
Cut two wooden skewers 30 cm long in half. Half with throw away with two blunt ends. Stick the skewers with the tip inwards on the sides of the snowman’s head at the level of his eyes. Trim the excess so to leave only 2.5 cm outside. Attach the donuts right up to to the head on each side, pushing them onto the skewer before touching the glaze on the cupcakes. Put two sour marmalade tapes on the top of the head 23 cm. Next to each other so that they connect the headphones. At need to trim the excess.
-
Wicker scarf
Fold four 91 cm sour marmalade tapes on top of each other and place vertically in front of you. Measure 10 cm. Down from the top and thread a toothpick through all 4 tapes. So you hold them together up. Separate the marmalade tapes below the toothpick so that they no longer stacked on top of each other. Start weaving with the rightmost strip, first passing it under the adjacent tape, then over the next and at the end under the last strip (left). The first weave should come out. Tighten the tape as you move to make the pattern neat. Keep going weaving by threading the same marmalade strip in reverse direction: first above the tape nearest to it, then under next and at the end above the last in the rightmost position.
- Repeat this pattern – weaving adjacent ribbons in direct and in the opposite direction – until the marmalade strip will be fully woven. Using a toothpick, attach another 91 cm tape at the point where the first ends, and continue until the new strand is also woven. Trim unstitched strips below. Use toothpicks, to fix the “threads” of the scarf. Repeat this process starting with four new tapes of sour marmalade, and then weave into them another fifth. The result should be 2 equal in length to half scarf.
- Divide the untwisted sections of ribbons at the top of the scarf halves by individual colored stripes. Attach one of the half of the scarf to back of the snowman, fixing with toothpicks. Neatly wrap the scarf so that its fringed edge is in front near buttons. Fasten the other half of the scarf at the back, if necessary overlap and wrap. As a result, the ends of the scarves should overlap on front of the torso.
- Keep refrigerated until serving.

