Recipe for a biscuit stuffed with sweets coated with blue glaze.
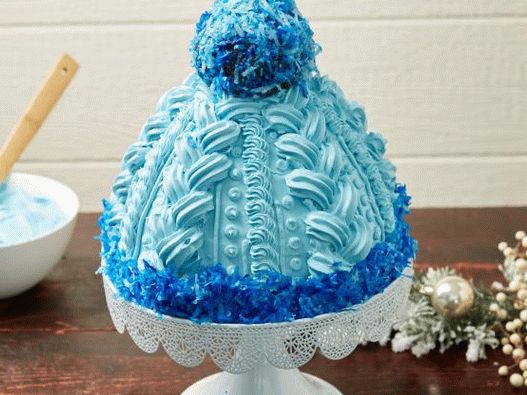
This cozy hat does not need knitting needles! Via creams with various decorative nozzles you can create the appearance of knitted wool. And after your guests have finished cheer, slice the cake and surprise them with the chocolate filling драже M&M’s .
 Time:3 hours one 5 minutes. Difficulty: medium Servings: 16 The recipes use volumetric containers: 1 cup (tbsp.) – 240 ml. 3/4 cup (st.) – 180 ml. 1/2 cup (tbsp.) – 120 ml. 1/3 cup (st.) – 80 ml. 1/4 cup (st.) – 60 ml. 1 tablespoon (tbsp.) – 15 ml. 1teaspoon (tsp) – 5 ml.
Ingredients for the recipe:
- Two packs (430 grams each) of a mixture for baking chocolate biscuit and essential ingredients
- Four containers (450 g each) of vanilla white glaze for cake (8 tbsp.)
- Blue food gel, for glaze
- 2 tbsp. chocolates in white and blue glaze such as M & M’s
- 200 gr. sweetened coconut flakes
- Special equipment: cone-shaped cake pan; 10 cm round cutter; pastry bag for cream with adapter (adapter), tip with a large star, tip with small star and small round tip
Recipes with similar ingredients: a cupcake mix, coconut, chocolate
Recipe preparation:
- Prepare the biscuit mixture according to instructions on the package and bake it in the form of a cake in the form cone. Allow to cool for 10 minutes.
- While the biscuit is still in shape, trim the top, using the edge of the form as a guide. It will give you a flat surface. Turn the biscuit onto the wire rack and completely cool.
- Meanwhile, place the icing in a large bowl and mix electric mixer at medium speed by adding a couple of drops food coloring, add coloring gradually to achieve desired shade of blue.
- Using a long serrated knife, cut the biscuit horizontally on 4 layers. Use a 10 centimeter round cutter to cut a hole in the center of the two lower wide layers. Leave the cut parts of the biscuit.
- Place the bottom layer on a cake stand or dish and cover the top with glaze. Place a second layer of biscuit on top so that the cut holes connect. Fill out deepening with chocolates. Glaze the top second layer and place the third layer on top. Cover last a layer of biscuit with icing. Using a small amount of glaze, apply a thin layer on the sides of the cake. Cool until hardened, about 30 minutes. Cover the cake with extra glaze.
- Place the adapter on a pastry bag (or you can use several pastry bags). Install on adapter tip with a big star and fill the bag with glaze. (See tip cook) .Using an oil knife, mark 5 evenly located vertical lines on the sides of the cake. Using pastry bag with a tip in the form of a big star, and following marked lines, apply glaze from top to bottom, 5 cm diagonal lines, alternating directions, you should get braid.
Cook’s advice
The adapter is a two-component plastic a device that allows you to change tips while working with one pastry bag.
- Change the nozzle to a smaller star. Starting at the top cake, squeeze a spiral into half circles between five braids. a nozzle in the form of a small round tip. Squeeze thin stripes on both sides of each line of semicircles. Next to them, draw lines of dots starting from top to bottom.
- Make a pompom on top of the cake: in the middle bowl mix the remaining biscuit with 1/4 tbsp. glaze until uniform consistency. Form a ball the size of a baseball and cool it on a plate in the freezer until it hardens, about 10 minutes.
- Place coconut shavings in a resealable bag of 1 liter and add 2 drops of blue dye. Shake the bag to the coconut has stained. Pour half of the coconut into shallow a bowl. Add 6 more drops of food coloring to the remaining coconut flakes in a bag. Shake the bag and pour it into another bowl. Roll the sponge ball in navy coconut, and then completely cover with light blue coconut flakes. Place the ball on top of the cake. From the remaining coconut make a border on the bottom of the cake.


